Code Self Study Wiki
This is the home of the new Code Self Study Wiki. It's still under construction, but more content is coming soon.
To edit or add pages, make a pull request on the Github repo.
Study Guides
This section will contain self-study guides for members.
Command Line Study Guide
This is a guide for becoming more familiar with the command line. These are some basic GNU/Linux terminal commands that are useful to know as a minimum.
Built-in Documentation
Most commands come with documentation in the form of "man[ual] pages". To read the man page for a command use the man command.
Example: to read the documentation for the ls command, type man ls in a terminal. You can also search Google for information on any command.
If the man pages are too overwheming, there is also a simpler tool called tldr.
List of Useful Commands
Click on the name of a command for more information.
Basics
clear-- clear the terminal. Also ctrl-l
Documentation
man-- read the built-in documentationtldr-- shorter, simpler documentation for commands
Where Am I?
pwd-- show your current location in the filesystemcd-- change directoryls-- list directory contents. Alsols -l,ls -R, andls -al.tree-- list a directory as a tree. e.g.,tree -d >> outputfile.txt. You may need to install it first.
An alternative way to move around and keep track of where you've been is to use dirs.
dirs-- a stack of recently visited directoriespushd-- move to another directory with a bookmark (actually a stack of directories you've jumped from, so you can use it multiple times)popd-- jump back to the place where you pushd'd from
Manipulating Files
cp-- copy filesmv-- move a file or directory. Also for renaming thingsmkdir-- make a directoryrm-- remove a file. Alsorm -rf, but very dangerous. See this story for a warning on how dangerous it can be.rmdir--- remove a directorytouch-- create a new empty file
Finding Files
grep-- search the contents of filesrg-- ripgreplocate-- find filesfind-- find files. E.g.,find / -name '*.desktop'fd-- a find command with some improvements
Programs
which-- tells you where a program is locatedapropos-- can't remember a command? Use this to find commands about a keyword, like:apropos wireless
Networking
pingdigtraceroute
Reading and Editing Files
less-- display output with paginationvim-- typevimtutorand see the [[Vim]] page.nano-- simple console editorcat-- display a file and/or concatenate it.bat-- likecatbut with syntax highlighting and other improvementstee-- redirect the output to a file and the screen at the same time. E.g.,ls -1 *.py | wc -l | tee count.txtwhich counts the number of Python files in your directory, writes it to the screen, and saves it to a file.wc-- count things: lines, bytes, characters, words, etc. Example:wc -l filename.txtwill count the lines in a file.head-- view the first lines of a filetail-- view the last lines of a filediff-- compare two different files
Users, Groups, and Permissions
chmodchown
The System
top-- show processes. If you like that, installhtop.htopdudfkillpsshutdownrebootuptimedatesleep
Compressing and Extracting Files
tarzipgzip
Other Tips
- tab completion
- pipes
|,>, and>> - aliases
- ctrl-r -- reverse search
- keyboard shortcuts: ctrl-u, ctrl-k, ctrl-a, ctrl-e, alt-f, alt-v, ctrl-d, alt-d (from Emacs)
For managing remote servers: ssh, scp, and rsync
And Tmux.
Additional Utilities
Some of these may need to be installed.
sort-- sorts itemsuniq-- gets only unique itemsmc-- Midnight Commander file browsertr-- translatefold-- wrap lines to a specified widthjq-- tools for JSONcurl-- do stuff with URLswget-- download pages and sitessql2csv(npm install -g sql2csv)csvkit(pip install csvkit)- xml2json (
git cloneit and add to path) - ImageMagick -- process and view images, e.g.,
display cat_pic.jpg,convert --resize 200x200 giant_hubble_photo.jpg hubble_photo_thumb.jpg rename-- bulk rename files with regular expressions. Example: rename all files with the extension.GIFto.gif:rename -v 's/\.GIF$/\.gif/' *.GIFlynx-- a browser in your terminal.
You will occasionally come across these:
sed-- stream editor for filtering and transforming textawk-- pattern scanning and processing language- Perl one line scripts
See additional tools that you might want to investigate:
https://forum.codeselfstudy.com/t/cli-improved-command-line-tools/1001
How to use the terminal for everything:
https://forum.codeselfstudy.com/t/using-the-terminal-for-everything/1005
tig can be used as an alternative to git log. ranger is a file browser.
https://forum.codeselfstudy.com/t/interesting-command-line-tools/112
Keybindings
See this post for useful keyboard shortcuts:
https://forum.codeselfstudy.com/t/becoming-faster-with-the-command-line/990
Additional Resources
See also 7 command line tools for data science.
See also GNU Coreutils Manual.
There are additional posts here: #command-line.
Docker Guide
At the moment, this Docker guide focuses on tips that can help while working on the Code Self Study website. To learn the basics of Docker, it might be a good idea to start with the official Docker guides.
Basic Concepts
A Docker container is something like a virtual computer that runs inside of your computer. Instead of installing software (like a database) on your computer directly, you can put it in its own container and run it from there. Multiple containers can be networked with each other to communicate. An end result of using Docker is that all the programmers on a project have the same development environment, including the same versions of all the required software.
A Docker image is a kind of blueprint for a container.
Docker containers are created from the images. You can have multiple docker containers that are based on the same image.
A Docker network connects multiple containers. If you use Docker Compose to manage your containers, it will automatically create the network for you.
A Docker volume mounts files and persists data after a Docker container is destroyed.
The base Docker command is docker. Other parts of Docker have sub-commands. For example, the commands for managing containers are behind docker container, the commands for managing images are behind docker image, and the commands for managing volumes are behind docker volume.
To list your Docker images, you would use:
$ docker image ls
To list your Docker containers, you would use:
$ docker container ps
The built-in help is good -- just type docker container to see the options for that sub-command.
You can download pre-made Docker images with the docker pull command, but the Code Self Study website creates custom images by using Docker Compose and Dockerfiles. If you look inside the Dockerfile.dev files in the project, you can see the commands that are run.
For example, the Dockerfile.dev file for the Express.js server looks something like this:
FROM node:12-alpine
WORKDIR /app
COPY package*.json ./
RUN npm install
COPY . .
EXPOSE 5000
CMD ["npm", "start"]
It says:
- Start with a preexisting Node.js image from Docker Hub (like Github for Docker images), using Node version 12 and Alpine Linux (a very small Linux distro).
- Set the working directory inside the images to
/app. - Copy the
package.jsonfile(s) to the working directory. - Install the dependencies.
- Copy the Express.js code into the working directory.
- Suggest exposing port 5000 for the Express server.
- Start the Express server with
npm start.
A Dockerfile can be built manually, but in the case of Code Self Study, all the containers are built with the docker-compose.yml file. Take a look in that file to see how the Dockerfiles are used.
# The API for the puzzle server
express_api:
    # wait for other containers to start first
    depends_on:
        - mongo
        - redis
    # build from the ./containers/express_api/Dockerfile.dev file
    build:
        dockerfile: Dockerfile.dev
        context: ./containers/express_api
    # mount the project files inside the container
    volumes:
        - /app/node_modules
        - ./containers/express_api:/app
    # set some environment variables
    environment:
        - REDIS_HOST=redis
        - REDIS_PORT=6379
        - SESSION_SECRET="this is only for development"
Restarting Containers
Rebuilding the entire application can take a while, and sometimes you will just want to restart one container (like the Gatsby container).
Here's how to restart a Docker container.
First, get a list of running containers:
$ docker container ps
CONTAINER ID        IMAGE                       COMMAND                  CREATED             STATUS              PORTS                  NAMES
f9466971430a        codeselfstudy_nginx         "nginx -g 'daemon of…"   6 minutes ago       Up 6 minutes        0.0.0.0:4444->80/tcp   codeselfstudy_nginx_1
b9b10f71037f        codeselfstudy_gatsby        "docker-entrypoint.s…"   6 minutes ago       Up 6 minutes                               codeselfstudy_gatsby_1
18febd3d8b84        codeselfstudy_express_api   "docker-entrypoint.s…"   6 minutes ago       Up 6 minutes        5000/tcp               codeselfstudy_express_api_1
d2d54e20f529        mongo                       "docker-entrypoint.s…"   6 minutes ago       Up 6 minutes        27017/tcp              codeselfstudy_mongo_1
75df2bbce79f        redis:latest                "docker-entrypoint.s…"   6 minutes ago       Up 6 minutes        6379/tcp               codeselfstudy_redis_1
If the container that you want to restart is codeselfstudy_gatsby_1, then copy the container ID and restart it like this:
$ docker container restart b9b10f71037f
You can also refer to it by the full name, if that's easier:
$ docker container restart codeselfstudy_gatsby_1
Freeing Disk Space
After a while, it's possible that Docker images will take up a lot of hard drive space. It's easy to clean them.
To list the images use this command:
$ docker image ls

REPOSITORY                  TAG                 IMAGE ID            CREATED             SIZE
<none>                      <none>              7d3aa3d696c0        2 minutes ago       307MB
codeselfstudy_express_api   latest              c7a0d49e0ade        2 minutes ago       140MB
To remove an image, for example the unnamed image above, refer to it by the IMAGE ID:
$ docker image rm 7d3aa3d696c0
You can list the dangling images (untagged as <none>) with this command:
$ docker image ls -f "dangling=true" -q
And delete them with this command:
$ docker image rm $(docker image ls -f "dangling=true" -q)
Or just use this command to remove the dangling images, stopped containers, and reclaim other space:
$ docker system prune
To see how much space Docker is using type this:
$ docker system df
TYPE                TOTAL               ACTIVE              SIZE                RECLAIMABLE
Images              28                  5                   14.27GB             13.53GB (94%)
Containers          5                   5                   263B                0B (0%)
Local Volumes       58                  5                   784.7MB             428.7MB (54%)
Build Cache         0                   0                   0B                  0B
Docker Cookbook
Here are some quick tips for common tasks.
How to run a stopped container with a custom command
Get the ID of the stopped container:
docker container ps -a
docker container commit <container_id> tmp_container
The name tmp_container is arbitrary. Name it whatever you want.
Then run it like this:
docker container run -it --entrypoint=sh tmp_container
More info is here.
How to manage containers with docker-compose
Here are some examples of how to run commands inside of containers by name when using docker-compose.
# start up the docker containers
docker-compose -f docker-compose.dev.yml up --build

# run commands inside of containers
docker-compose -f docker-compose.dev.yml exec django python manage.py makemigrations
docker-compose -f docker-compose.dev.yml exec django python manage.py migrate
docker-compose -f docker-compose.dev.yml exec django python manage.py createsuperuser

# restart containers
docker-compose -f docker-compose.dev.yml exec django restart

# load seed data
docker-compose -f docker-compose.dev.yml exec django python manage.py loaddata apps/app_name/fixtures/my_data.fixtures.json
docker-compose -f docker-compose.dev.yml exec django python manage.py loaddata apps/app_name/fixtures/other_data.yaml

# shut down docker containers
docker-compose -f docker-compose.dev.yml down
JavaScript
This page will contain a JavaScript self-study guide.
Python
This page will contain a Python self-study guide.
Vim
Data Structures and Algorithms
This is the entry point for the data structures and algorithms section. (under construction)
Big O
This page will contain information on big O notation.
(under construction)
Linked Lists
TODO
Stack
TODO
The Terminal
This section contains information for learning about basic GNU or other command line tools.
You might also be interested in the command line study guide.
ls
cd
cp
mv
mkdir
rm
rmdir
touch
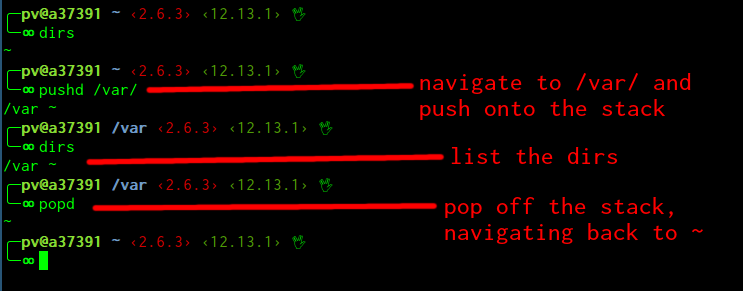
dirs (and pushd/popd)
The dirs command lists a stack of recently visited directories. You can push into the history with the pushd command, and pop off the stack (going back one location) with the popd command.
Compare dirs with the cd command. The cd command will change directory, but it won't remember your navigation history. You can use pushd like a version of the cd command that saves a history of where you've been.
Options
Some common flags for dirs are:
-c-- clear the stack-l-- long format-p-- one path per line-v-- one path per line with indices
Examples
These examples assume a unix-like operating system like GNU/Linux or Mac.
This command will navigate to the /var/ directory, pushing your last location onto the dirs stack.
$ pushd /var/
Display the stack:
$ dirs
Navigate back to the last visited directory by popping off the stack.
$ popd
Regular format (home is represented with a tilde):
$ dirs
/var ~/code/CSS/codeselfstudy_wiki
Long format:
$ dirs -l
/var /home/pv/code/CSS/codeselfstudy_wiki
Verbose option:
$ dirs -v
0       /var
1       ~/code/CSS/codeselfstudy_wiki
pwd
clear
less
nano
top
bat
bat is similar to cat or less but with syntax highlighting.
top
man
tldr
locate
find
grep
tree
tar
zip
gzip
wc
kill
kill
ps
shutdown
The shutdown command shuts down or reboots the computer.
Example:
$ sudo shutdown -r 0
reboot
uptime
chmod
chown
du
df
head
tail
diff
date
sleep
which
apropos
ping
dig
traceroute
Overview
This section of the wiki contains documentation for our group's projects. Use the left sidebar for navigation to the various pages.
Projects
Code Self Study Website
The website repo can be found here. See the main README.md in that repo for installation instructions.
Browser Extensions
The browser extensions (Firefox and Chrome) can be found at codeselfstudy/codeselfstudy_browser_extension.
They can be installed here.
News Site
TODO
Technology Overview
This page contains an overview the technologies used on the main website.
Docker
Active:
- Nginx -- requests get passed through an nginx container
- Gatsby -- server-rendered React with content loaded from a headless CMS
- Express API -- this authenticates with Discourse (forum) and serves coding puzzles
- Redis -- session store for the Express API
- Mongo -- data storage for coding puzzles
TODO:
- Phoenix/Postgres -- coming later once the site is ready for real-time features and the data gets more complex
- Rust/Wasm -- visualization of algorithms & data structures with WebAssembly.
Check out the containers directory. Each directory there is a separate Docker container.
For an introduction to Docker, see our Docker guide.
Here's a diagram. See the other pages in this section for details.
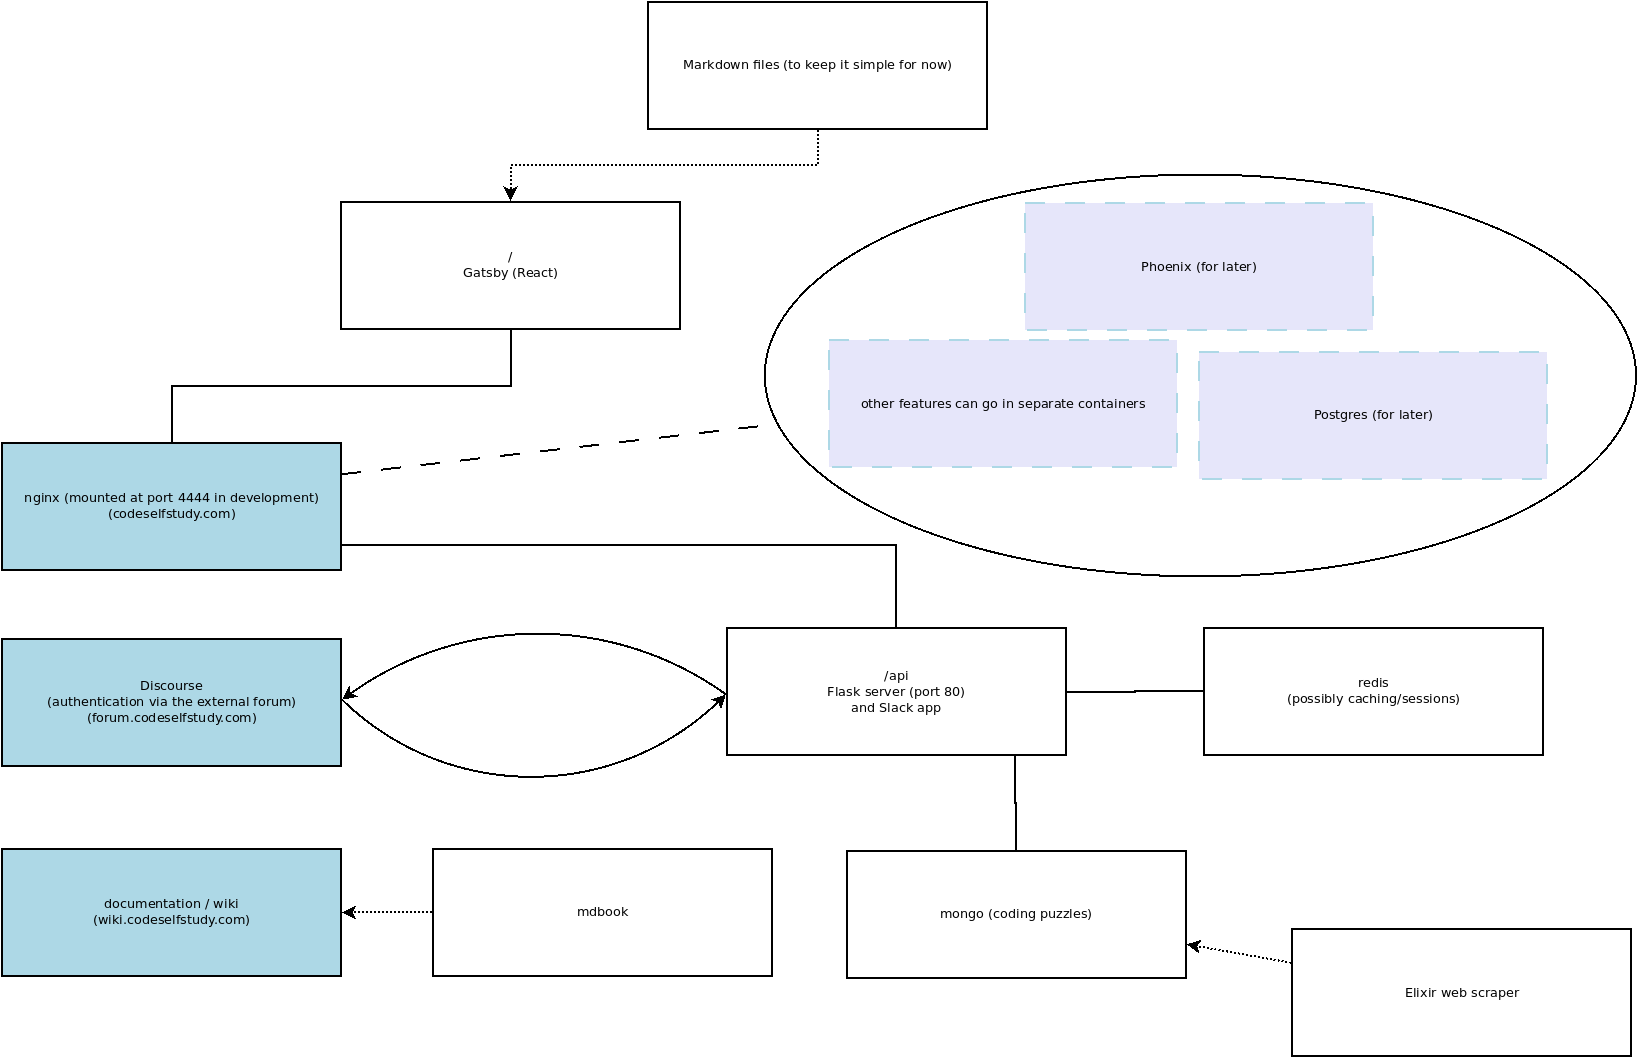
Nginx
The entry point is an nginx Docker container. It proxies all the requests to other containers.
Nginx internally serves on port 80, but port 80 is mapped to the host's machine (your laptop's) port 4444. To visit the site in development, visit localhost:4444.
See the containers/nginx/default*.conf files for details on how the requests are sent to the other containers.
# Defining the upstream applications. Gatsby, for example, is running on port 8000 in development.
upstream gatsby {
    server gatsby:8000;
}

# Express is running on port 5000
upstream express_api {
    server express_api:5000;
}

# Nginx listens on port 80 and proxies requests to the upstream servers.
server {
    listen 80;

    location /api {
        # Express doesn't know about the `/api` prefix, so this rewrites
        # the requests for Express.
        rewrite /api/(.*) /$1 break;
        proxy_pass http://express_api;
    }

    # Routes not matched above will go to Gatsby.
    location / {
        proxy_pass http://gatsby;
    }
}
Gatsby
Gatsby serves the main pages of the site. If we need SPA functionality, Gatsby can do client-side routing.
Express API
Express.js is mounted at /api and will serve the coding puzzles as well as handle authentication via the forum.
Mongo
This will hold the coding puzzle database for now. (MERN stack experiment)
Redis
This container holds Express.js sessions.
Wiki
This wiki is in a separate repo and auto-deploys on Netlify.
https://github.com/codeselfstudy/codeselfstudy_wiki
https://wiki.codeselfstudy.com/
These resources were useful in setting up the CI pipline:
- https://docs.travis-ci.com/user/deployment-v2/providers/netlify/
- https://docs.travis-ci.com/user/tutorial/
- https://github.com/travis-ci/travis.rb
Basically, Travis CI builds and deploys the site. A deploy key is encrypted and added with the Travis CI command-line interface (linked to above). The command travis login will connect the CLI to Travis, and then this command will add the encrypted Netlify token to the .travis.yml file.
$ travis encrypt --add deploy.auth <auth>
(Netlify doesn't have to be connected to Github.)
Phoenix
Phoenix/Postgres is coming later for real-time features and LiveView experiments (write frontend features with backend Elixir code).
WebAssembly / Rust
TODO: visualization of algorithms & data structures in WebAssembly (Rust).
I'm picturing something along the general lines of this but in WebAsseembly. (That code is here.)
Contributing
TODO: this page is a work in progress.
Coding Style
Please use Prettier.js to format the JavaScript, Sass/CSS, and HTML code. Every major editor has a plugin to auto-format the files on save (including one for vscode).
TODO: we could probably set this up with git hooks. I think there is a node module that runs git hooks from package.json.
JavaScript, CSS, HTML
The .prettierrc file contains the instructions for the editor. Just use an editor plugin that formats on save, and it will be correct. You can also format it manually by running this command at the root of the project:
$ make format
Reasoning:
- Other languages that we use (like Elixir) require double quotes for strings, so the JS uses double quotes for consistency.
- 4-space indentation is easier to skim.
This project transpiles the JS so it's okay to use the latest JS features.
Elixir
The project uses Elixir's auto-formatter. You can set up your editor to format on save or just run this command in the directory where the Elixir code is:
$ mix format
Python
Follow PEP8 where possible. Use double quotes for the same reason as the JS. Line length can be 160 chars. (See tox.ini.)
Roadmap
TODO
For now, see the project board and issue queue and/or talk to us at a meetup.